Showing posts with label Staircase. Show all posts

Monday, 29 August 2022

How Are Farmers are Coping in the Drought in the Loire Valley?

Local goats cheese producers are struggling to feed their herds. In order to retain their AOC certification for specific cheeses produced in specific locations they need to feed the goats with locally produced hay. 

Dairy goats, Indre et Loire, France. Photo by Loire Valley Time Travel.
Dairy goats.

A herd of five hundred goats will eat 900 kilograms of hay per day plus a bit of silage. This year farmers have only been able to cut half the quantity of hay that they would normally be able to produce. They are using stocks from last year, but if 2023 isn't a normal year they will not be able to replenish their stocks.
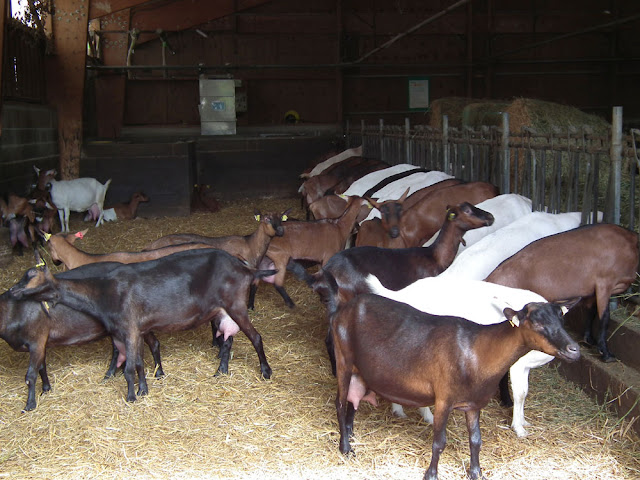
Dairy goats, Indre et Loire, France. Photo by Loire Valley Time Travel.
Dairy goats.

In the heat the goats suffer from a lack of appetite so they eat less and produce less milk. Normally each goat gives 3.5 litres of milk per day. At the moment the average is barely 3 litres per goat per day. 

Canola crop, Indre et Loire, France. Photo by Loire Valley Time Travel.
Canola crop in the Claise Valley in April.

Farmers report that their winter cereal harvest (that's wheat, barley, and canola) was 30 percent down. The spring sunflower yield will be 50 percent of normal and they are expecting maize to be 70 percent of normal. Many farmers do not irrigate as they have calcareous clay soils that don't require it (they may look dry on the surface, but retain a lot of water in the soil). Last year there was a bumper crop, this year over all will be just over half of last year. Rainfall has been half that required. Many farmers have come to the conclusion that maize is too water greedy to continue with in the Loire Valley.

Sunflowers, Indre et Loire, France. Photo by Loire Valley Time Travel.
Sunflowers in the Claise Valley.

Some farmers are struggling to work out from the officially issued regulations if they are still allowed to irrigate. Those farmers who have their own dams can still irrigate, which the general public doesn't always realise. 
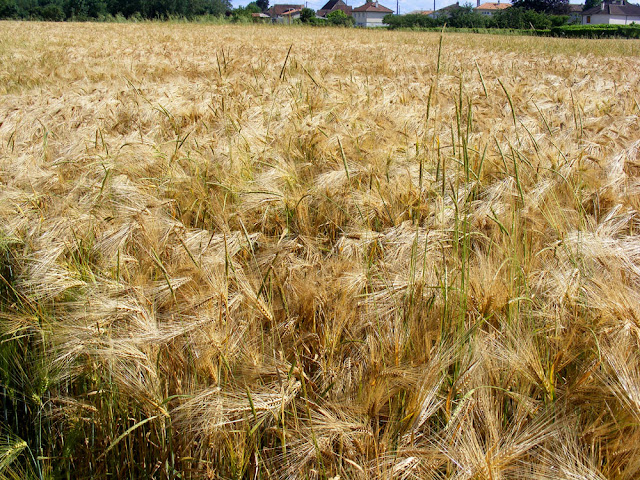
Barley crop, Indre et Loire, France. Photo by Loire Valley Time Travel.
Barley crop in the Vienne Valley.
 

Four hundred of the 1500 cereal growers in Indre et Loire irrigate as normal practice. There are 240 other farms which irrigate, mainly for growing forage (for example, dairy farmers, but market gardens and nurseries are also included in this category of farms not primarily growing cereals). 

Dry dam (étang), Indre et Loire, France. Photo by Loire Valley Time Travel.
Dry dam (étang).
 

Only seed maize needs to be irrigated now, this late in the season. That's a hundred farms in a total of 3000 farms of all categories in the Touraine. Farmers take the view that it is not the current irrigation that is causing a lack of water, it is the lack of rain in September 2021.
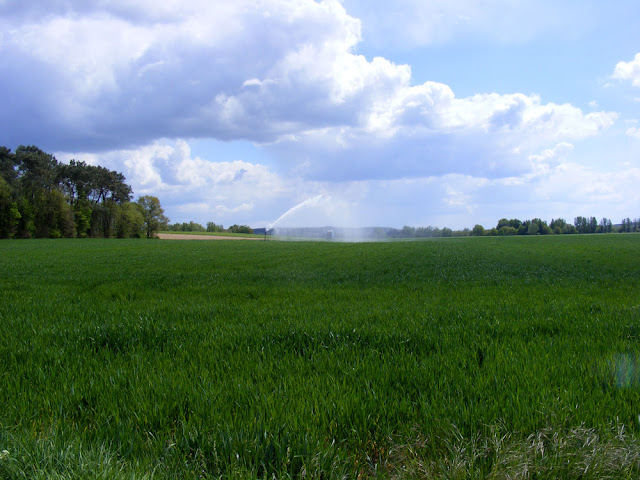
Irrigation of wheat, Indre et Loire, France. Photo by Loire Valley Time Travel.
Wheat being irrigated in late March in the Creuse Valley, where the soil is sandy.


Saturday, 1 October 2016

Moving a Wardrobe

For the whole of September our street has been blocked. Our neighbours across the road, Laurent and his family, have had their roof completely redone by local Preuilly firm Couverture Veron. The house is a holiday home and Laurent et al live in Alsace, coming down a few times a year for short breaks and a whirlwind of renovations. The truck and lifting machine used by the roofers, not to mention their scaffolding, has meant that the street has been blocked from 8am to 5pm every week day at the level of our courtyard. At night and over the weekends they have been parking their lifting machine in our courtyard, and that led us to have an idea.

 The wardrobe is loaded into the scoop.

In return for the use of our courtyard, which didn't really inconvenience us because we have space out the back as an alternative to park the car, we asked the roofers if they would help us get a wardrobe upstairs. They benefitted by being able to leave the big machine on site for the whole of the job, rather than having to drive it back to the depot every evening. The wardrobe we wanted moved has lived in our sitting room and stored things like guitars ever since we moved here and discovered it was too big by just a few centimetres, to go up our stairs and into our bedroom. What we wanted was for them to lift it up to the first floor bedroom window, which it would easily fit through.

 The apprentice rides up with the wardrobe. 
(I suspect he is taking the opportunity here to perve into Anne and John's workshop across the road.)

I explained our problem and we set a date for just after lunch the day before they finished Laurent's roof. We shuffled furniture as necessary and cleaned behind things that hadn't seen a vaccuum cleaner or a duster for quite a long time. I was rather shocked to see just how dirty one corner of our bedroom really was. 

 I couldn't get a photo of him doing his tightrope act, but here is the roofer, 
one foot on the windowsill, one on the scoop.

We lined the lifting machine's scoop with cardboard and lifted the wardrobe out of the sitting room window on its side. It isn't heavy or very large and fitted quite neatly. Just to be sure it wouldn't move though the apprentice roofer travelled up in the bucket with the wardrobe. On reaching the right height and distance from the upstairs window the roofer driving the machine stopped, hopped out of the cabin, tightrope walked up the hydraulic arm and jumped in through the window. Then he, the apprentice and Simon lifted the wardrobe in and set it down. Unbelievably easily done, taking no more than 10 minutes (probably less).

 Simon and the roofer lift the wardrobe in through the first floor window.

The wardrobe matches the other one in our bedroom, and the bedside tables. It is part of a suite of furniture that Simon acquired when he bought a house in Australia and the furniture was left in the house. There is also a bed and a dressing table, which we have in the guest bedroom. It is well made of some Australian hardwood (no doubt a eucalypt of some sort). It will be nice for Simon to have something a bit classier than a blue teflon zip up wardrobe for his shirts. But the guitars will have to find a new home.

A big thank you to the Veron roofing guys, who were friendly and careful throughout.

Monday, 10 February 2014

Varnishing the Staircase

While I was away Simon took the opportunity to embark on a major renovation project -- varnishing our staircase.

 Before (with one step half sanded so you can see the difference).
After it was installed I did the steps and risers of the bottom flight, and that is how the whole thing has  stayed for nearly 5 years. It was just too big, inconvenient and messy to contemplate finishing.

During (steps sanded and washed).

Simon's programme of work was as follows:

Day 1 sanding the top flight including banister with 80 grit sandpaper followed by 120 grit. For this a combination of orbital sander, 1/3 sheet sander and corner sander were used.

Day 2 sanding the top flight banister (all those angles and awkward unreachable bits!).

Day 3 more sanding.

Day 4 more sanding.

Day 5 more sanding then varnishing the whole of the top flight.

Day 6 knocked back the varnish on the top flight and gave it a second coat, followed by a first coat on the lower flight steps.

Day 7 knocked back the varnish on all the steps by hand with 400 grit, gave all of it another coat of varnish. After waiting 4 hours for the varnish to dry, everything was gone over with 400 grit again, dusted with a soft paintbrush and another coat of varnish applied, three steps at a time.

Day 8 all of the banister knocked back with 400 grit sandpaper (once again all done by hand), dusted with a microfibre cloth and given a very thin final coat of varnish.

Most of the days involved 8 -12 hours on him being on his knees, up to his neck in dust. He claims 7 vacuum cleaner loads of dust were generated, but most of it had been removed by the time I was home. The steps are silky smooth - using 400grit sandpaper means a finish like high quality furniture.

 After (ta dah!)

He's done a great job and it was a fabulous surprise. All of the smears the steps were left with from Stéphane's work rendering the walls are gone, they are a rich reddish mid brown colour and the handrails are smooth to the touch.

Tuesday, 28 February 2012

Winter Laundry Solutions

The view from the office.
We've never owned a tumble dryer and one of the things we really enjoy about living in France is that for much of the year we can dry the laundry outside on a line. In London we lived in a National Trust house, so we were not allowed to hang washing outside in case the sight of our smalls flapping in the breeze caused a visitor's experience to be ruined. With no room for a dryer inside washing used to hang around for days in my sewing room. And even in France there is that period from November to March where it mostly has to dry inside, because it is either too wet (not just rain, but damp misty days) or too cold to dry outside.

At the top of the stairs.
Until recently we had one of those stupid multi tiered laundry racks, which unless you are the size of a small infant, means that you have to thread your clothes through at least one of the wire grills to hang them full length. Trying to squeeze a pair of jeans through all those wires drives me crazy. Fortunately it started to fall apart, so I felt buying a replacement was fully justified.

Kitchen cloths on the rack in the bathroom.
It proved surprisingly difficult to find a laundry rack in a different, more user friendly style. Finally we managed it, at Babou, a household goods store, in Chateauroux. We've purchased a rack that hangs off the handrail at the top of the stairs and a long rack that stands at the back of the bathroom. Hanging stuff off the staircase rack is still somewhat challenging, but at least I don't have the palaver of threading the clothes through all the wires below.

Washing hung up here at the top of the house benefits from wafts of warm air rising and it mostly dries overnight. This isn't too bad a turn around, but still much slower than the mere couple of hours it needs outdoors in the summer time.

Susan

Tuesday, 6 December 2011

500 Year Old Floorboards Reused

These blocks of oak are 500 years old according to Stéphane, and were reclaimed from a floor in a grand old house in Loches that he worked on. They are quarter sawn and show a lovely grain known in French as maille ('chain stitch'). At 40mm, they are twice as thick as modern floorboards. Now, with their age, they are also extraordinarily hard. Stéphane broke several good tools working with this wood.

These particular pieces are two mounts that he fashioned for our staircase lights.

Susan

Tomorrow my mother is back into hospital to have an electronic ignition (known in non-motoring households as a pacemaker) fitted - Simon.

Saturday, 26 November 2011

The Niche

I wrote about a month ago that we were making a niche in the wall of the staircase. This is to allow us to display some of the stuff we have accumulated over the years.

Now that the walls of the staircase are finished we have installed the lighting, which makes the stairs a bright and attractive place (and safe!), and put the first item in the niche.

This is a late 19th century plough plane - a router for cutting grooves. It was Susan's great-grandfather's and arrived here a week ago.

I am really pleased with the whole thing: walls, niche and lighting. All we need do now is sand and varnish the stairs and that part of the job is finished.

Simon

Wednesday, 2 November 2011

Twelve Hours

That's how long it takes to cover a wall with chaux-chanvre.

Unfortunately, because of the nature of the beast, it is something that needs to be done all in one go, because if you stop for more than an hour the end result is patchy. As we are hoping we can leave that wall "au natural" it means that patches are not an option, and once he started, there was no way Stéphane could stop.

I made a movie of it, but luckily it isn't 12 hours long.

This morning, the wall looks like this, and should continue drying out for the next couple of months until it is almost pure white. You can see how wet the chaux/chanvre mix is by how much moisture has leeched into the staircase.


Simon

Sunday, 30 October 2011

Doing the Three-Step

The third step in our great leap forward is the continuing work on the staircase tower.

We have now finished three of the six really visible pieces of wall of the tower and are most of the way through the fourth. The third wall progressed in much the same way as the second, but the fourth will be completely different: wall four is to be chaux chanvre.

The third wall, between second wall and the colombage.
The fourth wall is under the colombage.
We arrived home on Wednesday evening to find that all the old render had been taken off walls three and four - the wall under the colombage. Wall four was in quite bad shape and quite a large area of wall fell out. This exposed a section of the lath, something we wanted to avoid if possible, on the grounds that the chaux chanvre won't stick to bits of dry old wood. On Thursday Stéphane applied the chaux/sable mixture to wall three, and filled in the gap where part of wall four had fallen off with cement.

Where we lost bits of wall
The missing parts filled with cement
On Friday the excess mixture was brushed off wall three to finish it, and after applying protection to that wall, a really runny mixture of chaux and cement was slopped on to wall four. This will give the chaux chanvre something to grip onto.

Protection applied, time to get sloppy
This is where we are this morning: wall three completed, wall four ready for its layer of chaux chanvre which will be applied in one coat about an inch thick. Wall three has quite a few large pieces of stone exposed - you can see them in the first photo, taken before the chaux was applied, and also in the photo below. It looks beautiful.


Simon

Monday, 24 October 2011

If you can't find a niche...

... you have to make one. Which is exactly why we have been taking stones out of our metre thick wall.

I have always liked the look of niches in stonework, but in this house we only have one which is in a roof space that was too low to use so was blocked off when we insulated. Thus I decided that I would like a niche half way up the stairs, a place which is always difficult to decorate.

This we started as soon as the first lot of pierres vues work on the upper staircase was finished. After identifying a place where both the stonework would allow us to remove stones without collapsing and the niche would be viewable, we started - gently at first, but progressing on to hitting things with a hammer and levering with a crowbar. It was interesting (if a little alarming) seeing a 1 metre section of wall compressing sideways as we levered, but we managed to take out the required stones without causing any damage. This has left us with a niche about 20cmx25cm.

The stones we removed to create the niche are really in what is the end wall of the graineterie, the oldest part of the building(s). The construction is typical of very old stone buildings, and is a sandwich of two thin (and quite skimpily mortared) stone walls infilled with mud and smaller stones. This makes for a very solid, thick wall which should hold itself together for a long time. Now we have exposed the mud we have to cover it up again, which we will be doing with chaux mortar.

We have put in an oak lintel, made out of the wood that was once our back door's doorpost, and we have set a low energy downlighter which was surplus to requirements in the the kitchen into it.

The next big decision is what we are going to put in the niche, but that will have to wait: we have serious kitchen fettling to do this week.

Simon

Thursday, 20 October 2011

More Staircase Tower

I wrote last week about doing the chaux chanvre at the top of the staircase tower.

The other walls of the tower need finishing too, and most of this is being done the same way we finished one of the staircase walls last year, even down to the amount of dust created by removing the old render.

The old render is removed to expose all the
stones to a depth of about 3cm
A mixture of chaux and red sand is applied
in a layer thick enough to cover all but the
most protruding stones
Once the chaux/sand mixture has been allowed
to dry slightly (about 12 hours), it is brushed back
with a wire brush to expose however much of
the stone you want to see.
We have now started on the other walls: there are two walls on the staircase that need the same treatment, and teo walls we will have covered in chaux chanvre. Although this means that the staircase walls will not all be finished the same, it appears that this is the way the walls were originally done and it will be nice to give a nod to the age (and complexity) of the building.

Simon

Thursday, 22 September 2011

Starting to finish a job

or finishing the start, I am not sure...

Back in June last year we published a photo of the slates on what was once the outside of the staircase tower. We had to work quite hard to convince the labour force that we wanted the slates left in place as a historical document and evidence of the building's history, but we managed it. All we did at that time was apply 2 layers of glass wool insulation to the slates, tied and taped.

This left the other side of the wall as a bit of a problem: the tiles are hung on laths nailed between upright posts. Although this is terribly authentic, it isn't very aesthetic, or indeed easy to keep clean. There is a lot of couple of hundred years of dust up there, which will be almost impossible to keep from entering the rest of the house.

Looking up toward the top of the staircase tower.
We have therefore decided to infill the sections between the uprights with chaux-chanvre, a mixture of lime mortar and hemp straw. This will give us a very traditional looking finish that also has insulating properties. The effect will be colombage (what is know in England as "half timbered") where the uprights are still visible, but the spaces between infilled with a mortar mix.

In order to get the mixture to stay on the wall you need to provide support, which we have done with a new framework within the uprights. This will eventually be hidden by the mortar, which will be applied in a couple of 2" (5cm) layers.

The new inner framework
Added to the wooden framework there are rows of nails, which will help hold the mortar in place while it dries. Eventually the mortar will eat its way through the nails, but by then the mortar layers will have bound together and be completely stable.

Nails to hold the mortar bound together.
We are not sure how long this procedure will take: not that it is in itself a long task, but there are plenty of other jobs having to be done at the same time before winter arrives.

Simon

Saturday, 23 April 2011

More Sanding

Ever since I remade the bathroom (but now the office) floor, there has been a six inch step up into the room. In order that people don't slip off the upper floor level it has been our intention to use some of the pieces of the old staircase we saved when the new staircase was installed and put up a rail.

Pieces of ancient staircase.
Yesterday I collected up some of the pieces, and in a right sorry state they were, too. I am not sure how old they are, probably C19th, but for a long time they have been unloved. A couple of hours with sandpaper and things were looking considerably brighter.

One to go. No prizes for guessing which one!
Today I will slip over to Bricomarché in the hope they have some bits of oak, as I need to suppliment what we have - I am not sure why, but we have saved more balistrades than banisters (maybe because they are interestingly bent, and banisters are just sticks*) . I could go to the sawmill, but I only need two little pieces of oak, and the sawmill would be a long way to go for just that.

Simon


* that's right - you have never slid down a banister. You may, however, have slid down a balistrade.

Sunday, 3 January 2010

A Door on the Stairs

We really love our staircase - it has opened up a whole new life for us, making the upper rooms of the house usable.

They have, however, presented us with one problem.

The stairs go all the way up to the attic. Owing to the way walls and roofs were put together in the old days, we have a 30cm (about 1') gap between the walls and the roof where a soffit board would normally go. This gap allows a nice breeze to keep the roofspace cool and the wooden beams dry and rot free.

Our problem is that word breeze - there is nothing to stop a freezing wind howling through the same gap, nor is there anything to stop all our nicely warmed air escaping. This means that although we can heat the front room to nearly sauna conditions, the rest of the house remains arctic. I have effected a temporary fix - the metres of bubblewrap we bought from London around delicate electronics had been pressed into service as a curtain - and it works quite well. I have taped and pinned it, and although it flaps a bit when the wind gets up, it does stop most of the breeze. We must have had a fairly strong wind while we were away in Australia - there were gaps all around the bubblewrap which required further taping - you can see in the photo that I have applied the new lot of tape with some gusto.

It is only a temporary measure. In the fullness of time I will be putting in a door across the gap. We had a door on the old staircase, but it was at the foot of the second flight of steps, and made the whole staircase very dark. My new plan is to have a door half way up the stairs, thus allowing more light on to the lower flight.


It took ages to work out how to do this, which is why it didn't get built before winter set in. There is no way I am taking down the temporary screen while it is still so cold (a very heavy frost yesterday morning), so the building work will have to wait until spring arrives.

At least I know what I have to do, and have plenty of time to get myself mentally prepared for the job. I am not the world's best woodworker, and I am filled (filled, I tell you) with trepidation at the thought of building something that will be in place for ever. That means it has to be perfect so as not to totally detract from the beauty of the stairs.

Come back in April, I may be able to tell you how it went!

Simon

Monday, 9 November 2009

Six Months in France

Today we have been living in France for half a year, and a pretty busy six months it has been too. For those of you who weren't paying attention at the time, I will re-cap:

May's big event was our move - the first half of the month was taken up with packing (which was hateful, as ever), cancelling things like the UK internet connection, having the phone disconnected and a million and one other little things. As is often the way with these things, the big things were easy by comparison. We left London on the 11th May and had an comparatively relaxing drive (except for an issue with the fanbelt on the car). We arrived in Preuilly on the 12th, exactly 182 days ago, and apart from my trip back to London to collect our plants (noble Simon...) and Susan's trip back for her conference we have settled in.

Calais at 5.00am, 12 May 2009
June's highlight was taking over care of the potager/verger, and getting to grips with a surplus of cherries. Our temporary kitchen arrangements worked surprisingly well, and we made 5 batches of cherry jam, froze some compote and stewed fruit. By the time next June arrives I may have forgotten the pressure we felt under to process all that fruit and be prepared to do it all again.

The undoubted highlight of July was the staircase: first of all laying tomettes for the bottom of the stairs to rest on, then the manufacture and installation of the stairs themselves. The stairs have made a huge difference to our lives: we have a house instead of a room to live in.

In August I revisited painting, starting with shutters and windows. I started painting the windows in August 2007(!) but didn't get around to doing the shutters to go with them. At the same time Susan painted the guest bedroom.

In September Célestine came into our lives. So far it has been great fun (if a little frustrating at times) getting to know her, but she is now settled in and doing fine.

Celestine at the Chateau in la Celle Guernand
In October our chimney was built (and just in time!) This means we now have lovely warmth in at least one room of the house, and can even invite people to take their coats off when they call in.

This month's tasks? Sorting out the back garden and the front courtyard.

Looking at all this I have given myself a bit of a shock - we appear to be doing a fair amount of style, what with the staircase, the fireplace and Célestine. Maybe Susan expected that, but style is something new (and slightly scary) to me. I hope it continues!

Simon

Sunday, 13 September 2009

Varnishing the Stairs

Varnishing the stairs looks like being a herculean task. There's a lot of surface area to two storey's worth of staircase when you take into account all the underside as well. We bought a product ages ago to do them with called Syntilor Vitrifacateur Parquet, in clear satin finish, which is a type of polyurethane.

Then we kept putting off the job because:
  • we couldn't manage a single block of time long enough to finish it.
  • we couldn't work out how to keep the dust off the drying varnish.
  • after we got it home, we realised that Syntilor products use a proprietary dilutant / solvent, not good old white spirit. We'd bought the tin of Syntilor at BricoDepot in Dissay, which is far enough away for us to be reluctant to go back just for one item. Nobody more local sold Syntilor.
  • we wanted to test the varnish on some samples of wood that the menuisiers had left us, in case we really didn't like the effect, but because we didn't have the solvent, were worried about ruining our brushes.
  • in the meantime, the staircase was being used and getting dirty. It would have to be cleaned before varnishing.
In the end, we opened the tin, poured some out and painted a test piece. The Syntilor turned out to be extremely easy to apply and gave us more or less the look we wanted. One of the reasons the lack of the correct solvent was a problem was because we had assumed we would get a better finish if we diluted the product, but this turned out not to be the case. Even though it clearly didn't need diluting, our 15 litre tin was going to go a lot further than we expected, which was a bonus. We soaked the brush in white spirit for 10 or 15 minutes. The brush cleaned OK, but the Syntilor and the white spirit reacted and caused the plastic container to crack. We figured that if we cleaned the brushes out immediately and put the waste liquid in an old metal paint tin it would be OK.

We decided to split the job up, so I cleaned the stairs from the ground floor to the first with the Starwax product I had been so happy with on the wooden floors. Once again, it did an excellent job. After giving it a few hours to dry, I applied the first coat of varnish just to the treads and risers, using a spalter (a very wide thin short bristled brush). The next morning I applied a second coat (no sanding between coats required). It dries quickly enough for falling particles not to be too much of a problem, with is a relief.

That's as far as we've got with it, but when we get round to varnishing the banisters, handrail and underneath, we'll give the steps a third coat. It's brought out the colour in the wood so it is rather red, but it goes fine with the tomettes, and I am glad we didn't stain it dark (which would be the traditional French approach).

Susan

Friday, 31 July 2009

The Finished Article


A special one - the staircase was finished at 16hr.

Simon

P.S The music is "Cause We've Ended as Lovers". Written by Stevie Wonder, and played by Jeff Beck.

Almost There!

We are getting close - first flight of steps is complete and usable, second flight is half done and will be finished by lunchtime.

Just for certain people (you know who you are) a movie.


Nicolas, who has been team leader on the installation
(and speaks American) sits on half a staircase

Jean-Louis arrives with the afternoon's reinforcements
(and the second half of the staircase)

Simon

Thursday, 30 July 2009

To Pick up on an Earlier Theme...

... WOOHOO!!

At last we have something that quite definitely is starting to look like the beginnings of a staircase!!

Our old staircase was démonté in 2 hours yesterday morning, which is quicker than I would have done it myself (and a lot more scientific - I just know that if I had demolished the second flight a good proportion of the house would have to have been rebuilt). We have kept the old banister and stringer arrangement as a souvenir and future house decoration because it felt plain wrong to destroy such a lovely old thing (oops - am I not appearing totally practical here?). It is made of oak rather than exotique, and it was trop triste to think of it being burnt as firewood.

Next stop, roof.
By lunchtime the stringers were (more or less) in place; trying to put something new and straight into something old that isn't straight takes a lot of adjustment and thought.

The adjustments and thought that went into putting the stringers in place was as nothing compared to the effort, thought, shifting of positions (both physically and mentally) and finagling involved in getting the noyau in the right place - and then the ever more involved process of making the marches and contremarches fit. Part of the problem is that the landing isn't level so a decision has to be made as to where the stairs actually arrive to. We have decided they should arrive at the highest point, and that at some stage in the future we will lift the floorboards and insert shims to make it level. Or something - maybe "levelish" would be a more realistic aim!

The staircase builders were here until gone 6.00pm, and the team of 3 was supplemented during the afternoon by the boss (M.Chaboisson) and by Jean-Louis (who gave the impression of having stopped by on his way home from work).

So this is where things stood at the end of play yesterday. We were assured that they have broken the back of it and things should go smoother and faster today, which so far (they arrived at 8.00) appears to be the case. Apparently no-one had told them (until Jean-Louis arrived) that all the steps were 50mm longer than necessary so that they could be cut in-situ to fit the vagaries of our walls.

Sitting around while experts push bits of wood around and look slightly concerned is a stressful thing. I kept on getting worried that things weren't going right and everything was going to be an issue and we weren't going to be getting a staircase after all. Luckily, Henri Proust arrived bearing a bottle of Thierry Landry (Chinon) red and distracted us just enough to make it all ok again.

Soon we should have a staircase - until then we have a beautiful piece of abstract (or maybe impressionist, on the grounds that it gives the impression of being a staircase) art.

Simon